Uploading Files in Chatbot
Customers and LiveChat Agents can transfer files to each other during a chat. AmplifyReach Livechat provides an easy way to share files. Admin can restrict the file types. He can also access all files uploaded during the chat. The files uploaded in chat conversations can also be sent to your AWS if required.
Sending files from LiveChat Agent to End User
Steps to share a file with a customer on chat:
- Select Settings in the chat area.
- Select “Files Attachment” option.
- Select file and send.
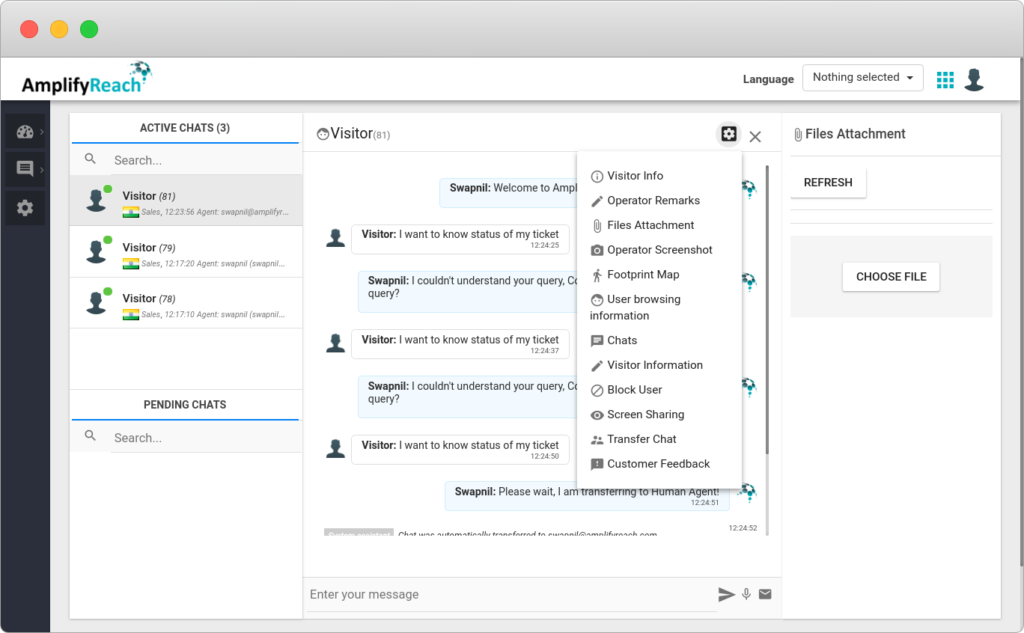
- You will be able to see “Choose File” button and “Refresh button” on Right side panel.
- Select the “CHOOSE FILE” button. You can select a file from your computer which you want to share with a customer.
- The customer will receive the file sent by the Agent.

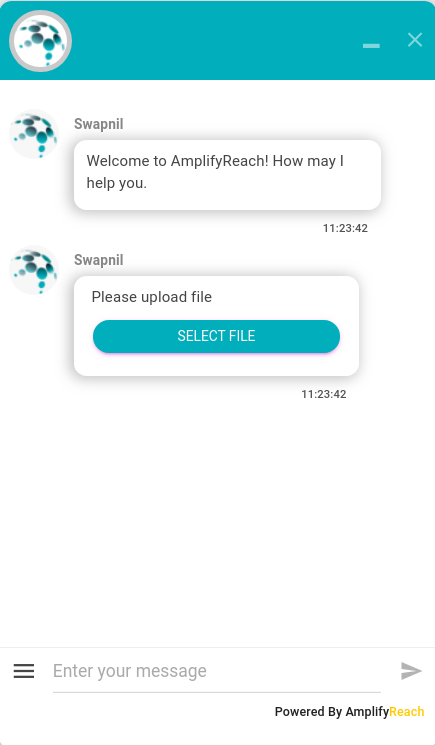
Sending file on chat as visitor
Visitors can upload files to Chatbot or Live Agent in two ways:
- If Chatbot expects a user to upload a file during conversation – you can build the conversation to show an upload button in chat, and wait till the user uploads the file.
- User can upload the file from menu option near typing area.

Enabling File Sharing
You can enable/disable file sharing feature.
- Go to AmplifyReach Dashboard -> LiveChat -> Left Panel -> Settings -> Conversation Configuration
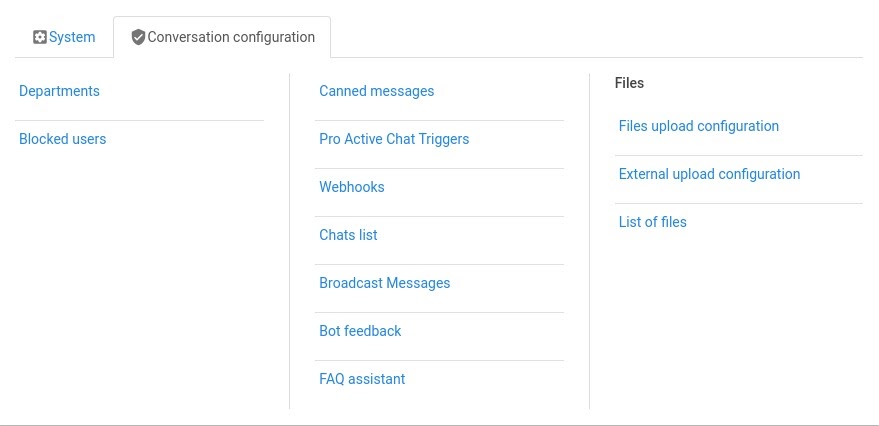
- Select File upload configuration.
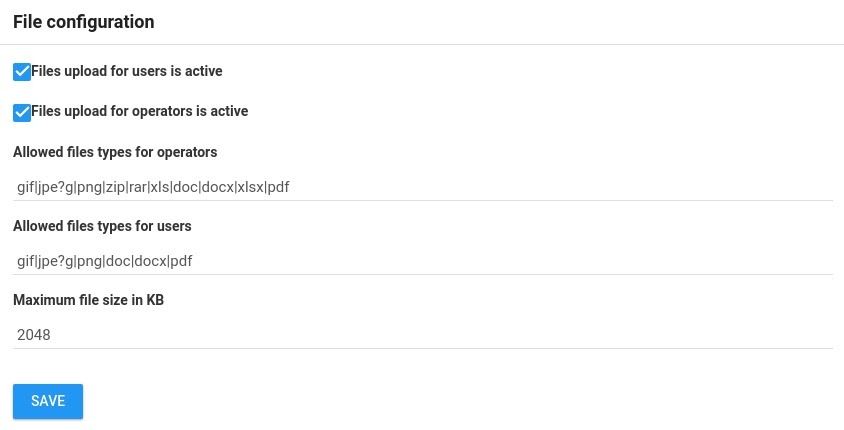
- Select following options as per requirement
- File upload for users: Enable this option if you would like to allow visitors to send files to Chatbot/ LiveChat.
- File upload for operators: Enable this option if you would like to allow LiveChat Agent to send files to customers.
- Allowed files types for Operator: You can restrict the type of files that can be uploaded by LiveChat Agents. You can add supported extension using pipe character ( | ). For example to allow only pdf and xls file type, enter: pdf|xlsx.
- Allowed files types for users: You can restrict the type of files that can be uploaded by users. You can add supported extension using pipe character ( | ). For example to allow only pdf and xls file type, enter: pdf|xlsx.
Maximum File Size: You can restrict file size by giving max file size to upload file either from visitor or from Live Agent. You can set max file size by giving file size in KB
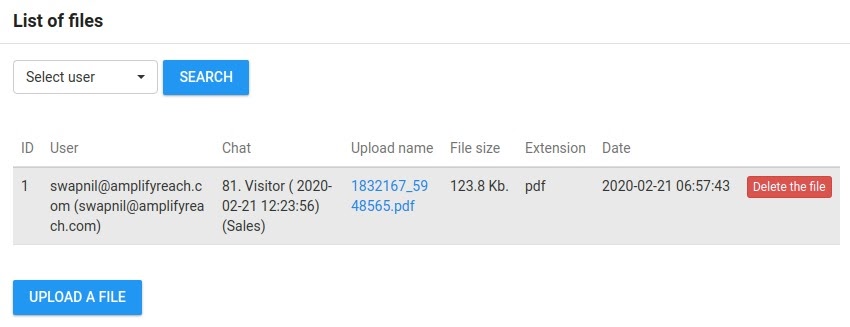
Accessing uploaded files by Admin
Admin can access all files transferred during the chat sessions.
In the File Upload section, select List File.
Uploading files on AWS
You can get uploaded files on AWS or on your callback URL. This is an additional setting which helps to get uploaded files on your infrastructure.
You can integrate AWS bucket with AmplifyReach Platform using following simple steps:
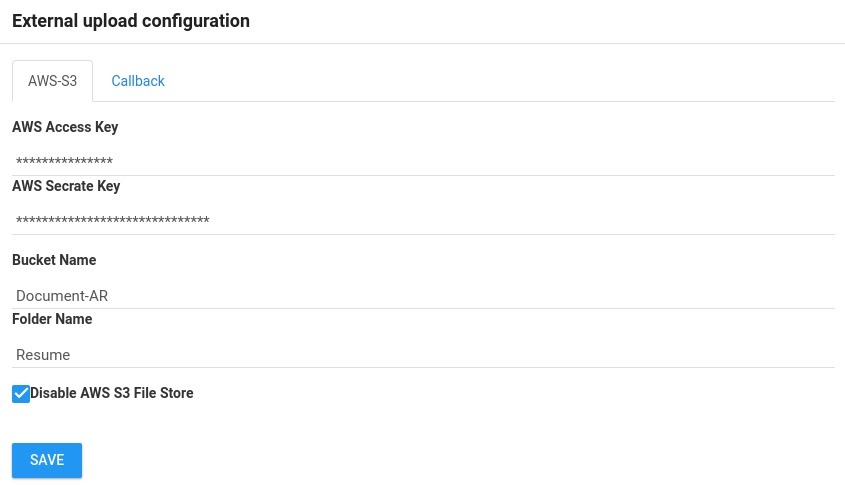
- Access Key & Secret Key: To access your Amazon-S3 (AWS-S3) account automatically, the Access Key and the Secret Key are required. The Access Key and the Secret Access Key are not your standard username and password but are special tokens that allow our services to communicate with your AWS account by making secure REST or Query protocol requests to the AWS service API.
| Tip: Information on creating Access Key and Secret Key can be found on below page, https://aws.amazon.com/premiumsupport/knowledge-center/create-access-key/ |
- Bucket Name: Please provide AWS-S3 bucket name. A bucket is a logical unit of storage in Amazon Web Services (AWS) object storage service S3. Buckets are used to store objects, which consist of data and metadata that describes the data.
| Note: To create a bucket, you can use below link for reference: https://docs.aws.amazon.com/AmazonS3/latest/dev/UsingBucket.html |
- Folder Name: The folder is a subdivided part of the bucket. In which AmplifyReach creates a nested folders as per chat ID. All the documents related to that particular chat id store in the chat id folder.
- Disable AWS S3 File Store: External storage can be enabled/disabled by a single click. Selecting “Disable AWS S3 File Store” disables external storage and can be enabled back again by deselecting it.
External CallBack
CallBack allows Customers to receive real-time HTTP notifications of file upload in the AmplifyReach Chatbot. For example, AmplifyReach could send a notification, when either the end user or Live Chat agent has uploaded/sent a file in the chat conversation.
To get uploaded file using Notification/Callback, use following simple steps:
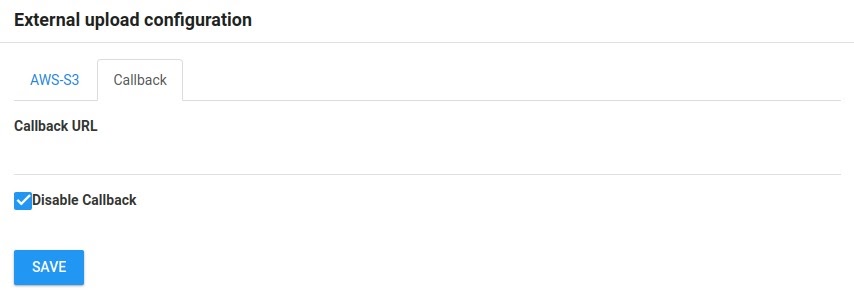
The customer can define their own callback URL (as defined in the table below). AmplifyReach shall call URL to forward the document with metadata information. Customers will be able to configure the Callback URL in LiveChat Admin.
| API Name | Callback |
|---|---|
| URI | Callback URL where AmplifyReach chatbot platform will send notification. |
| Header | Content-type:form-data multipart-request |
| Method | POST |
| POST-Form Data | {“file” : “<ATTACHED_FILE>”;“chatID” : <CHAT_ID>} |
| Success Response | {“status” : 0,“uid” : “<UNIQUE TRANSACTION ID>”,“url”: “<ACCESS URL>”} |
| Error Response | {“status” : 1,;“message”: “<ERROR_MESSAGE>”} |
| File | File field contains multipart file data. |
| ChatId | AmplifyReach provides a chat id which will be used to map uploaded files against chat Id. It will be useful for further mapping. |
Callback Response format
The response should be sent in JSON format with the following fields.
- Status: Where status 0 means request processed successfully. Status 1 means error.
- Uid: your service should provide uid for that file.
- Url: access url